5 Running jobs with Slurm
The scheduler, the anatomy of a batch job, and how to ask for the right resources.
5.1 Why a scheduler exists
5.1.2 The two ways to run work
Batch jobs (sbatch) are the normal mode: you write a script that lists the resources you need and the commands to run, submit it, and walk away. Slurm runs it when your turn comes and writes the output to a file. Use this for essentially all real computation. (Section 5.2)
Interactive jobs (salloc) give you a live shell on a compute node for debugging, exploring data, or developing a script. You still go through the scheduler and consume your allocation, but you get a prompt instead of a script. (Section 7.3)
Both run on compute nodes, not the login node (Section 1.1).
5.1.3 The three questions every job answers
Whether batch or interactive, you tell Slurm three things:
| Question | Directive | Covered in |
|---|---|---|
| Who pays? (which project) | --account |
Section 5.2 |
| How much, and how long? | --cpus-per-task, --mem, --time, … |
Section 5.3 |
| What kind of node, and how urgent? | --partition, --qos |
Section 6.1 |
Get these right and jobs run smoothly. Get them wrong and you wait a long time, get rejected at submit time, or watch the job die partway through. The sections that follow take them one at a time.
5.1.4 A first look at the tools
You’ll meet these properly later; here’s the vocabulary:
sbatch submit.sh        # submit a batch job
salloc ...              # get an interactive session
squeue --me             # what are my jobs doing?
scancel <jobid>         # cancel a job
sacct -j <jobid>        # after the fact: what happened, and how much did it use?
ARCC also ships friendlier wrappers — showjobreasons (“why isn’t my job running?”), showuserlimits (“what am I allowed to ask for?”), showpartitions, sqos — used in Section 6.1 and Section 7.1.
5.2 Anatomy of a batch job
5.2.1 The smallest useful job
Here is a complete, working submit script. Save it as submit.sh:
#!/bin/bash
#SBATCH --account=<project>     # WHO PAYS — the one you can't omit
#SBATCH --job-name=hello
#SBATCH --time=00:10:00              # 10 minutes; jobs are killed at the limit
#SBATCH --cpus-per-task=1
#SBATCH --mem=4G                     # always set memory explicitly (see below)
#SBATCH --output=slurm-%j.out        # %j is replaced by the job ID

echo "Running on host: $(hostname)"
echo "Job $SLURM_JOB_ID started at $(date)"

module purge
module load gcc/14.2.0 python/3.12.0

python my_analysis.py

echo "Finished at $(date)"
Submit it:
sbatch submit.sh
# Submitted batch job 123456
Watch it and read the output:
squeue --me                 # is it pending / running?
tail -f slurm-123456.out    # follow output as it's written
That’s the loop: write script, sbatch, watch, read output.
5.2.2 The required directive: --account
#SBATCH --account=<project>--account is your project, not your username
Every job on MedicineBow must specify an account, and it’s the project name (<project>), not your login name. Leave it out and the job is rejected immediately. This is the most common first error. Confirm your exact project name when you get your account (Section 1.2) and put it in every script, or set it once as a default:
# add to ~/.bashrc so you never forget it
export SBATCH_ACCOUNT=<project>
Even so, keep --account in the script itself. It documents intent and survives being run by a collaborator whose default differs.
5.2.3 Anatomy, directive by directive
| Directive | What it does | Notes |
|---|---|---|
--account |
which project pays | required |
--job-name |
label in the queue | makes squeue readable |
--time |
wall-clock limit | job is killed at this limit — pad it a bit |
--partition |
which hardware pool | default is mb; see Section 6.1 |
--qos |
urgency/limits tier | default is normal; see Section 6.1 |
--cpus-per-task |
CPU cores | see Section 5.3 |
--mem |
memory for the job | always set this — see below |
--output |
where stdout/stderr go | %j = job ID, %x = job name |
--mail-type, --mail-user |
email on events | END,FAIL is a sane choice |
#SBATCH lines must come before any real commands; the first non-comment, non-#SBATCH line ends the directive block. After that, it’s a bash script that runs on the compute node.
5.2.4 Set memory explicitly
mb
On the default mb partition, if you don’t set --mem, Slurm gives you 10 GB per CPU core (DefMemPerCPU=10000). So this request:
#SBATCH --cpus-per-task=8 # and no --mem lineasks for 80 GB of RAM, which is harder to schedule than the 8 GB you probably needed, so the job queues longer. Set --mem (whole-job) or --mem-per-cpu explicitly. Covered in depth in Section 5.3.
5.2.5 Making the environment reproducible
A batch job starts in a mostly clean environment. Build the environment you need inside the script so it runs the same way every time, independent of what you had loaded at submit time:
module purge
module restore geostack        # a saved module set (see @sec-modules)
# or, for conda:
module load miniconda3/24.3.0
conda activate geo
5.2.6 Useful variables inside a job
Slurm sets environment variables your script can use:
$SLURM_JOB_ID          # the job's ID
$SLURM_CPUS_PER_TASK   # cores you were given — pass to your program's thread count
$SLURM_ARRAY_TASK_ID   # which array element this is (see @sec-arrays)
$SLURM_SUBMIT_DIR      # the directory you ran sbatch from
A common pattern matches your program’s threads to what Slurm gave you:
export OMP_NUM_THREADS=$SLURM_CPUS_PER_TASK5.2.7 Copy-paste starters: Python, R, and Julia
Three complete, runnable “hello world” jobs. Save one to a file, set --account to your project, and submit with sbatch <file>. The output lands in hello-*-<jobid>.out. Each uses the fast QOS and a 5-minute limit so it starts quickly (Section 6.2). The module lines are verified against the machine — note that R needs gcc/15.2.0 and Julia needs no compiler module.
Save as hello_python.sh:
#!/bin/bash
#SBATCH --account=<project>
#SBATCH --job-name=hello-python
#SBATCH --partition=mb
#SBATCH --qos=fast
#SBATCH --time=00:05:00
#SBATCH --cpus-per-task=1
#SBATCH --mem=2G
#SBATCH --output=hello-python-%j.out

module purge
module load gcc/14.2.0 python/3.12.0

python3 -c "import platform, socket; print('Hello from Python', platform.python_version(), 'on', socket.gethostname())"
Save as hello_r.sh:
#!/bin/bash
#SBATCH --account=<project>
#SBATCH --job-name=hello-r
#SBATCH --partition=mb
#SBATCH --qos=fast
#SBATCH --time=00:05:00
#SBATCH --cpus-per-task=1
#SBATCH --mem=2G
#SBATCH --output=hello-r-%j.out

module purge
module load gcc/15.2.0 r/4.5.3          # R is built against gcc/15.2.0

Rscript -e 'cat("Hello from R", as.character(getRversion()), "on", Sys.info()[["nodename"]], "\n")'
Save as hello_julia.sh:
#!/bin/bash
#SBATCH --account=<project>
#SBATCH --job-name=hello-julia
#SBATCH --partition=mb
#SBATCH --qos=fast
#SBATCH --time=00:05:00
#SBATCH --cpus-per-task=1
#SBATCH --mem=2G
#SBATCH --output=hello-julia-%j.out

module purge
module load julia/1.11.6                 # Julia is standalone — no compiler needed

julia -e 'println("Hello from Julia ", VERSION, " on ", gethostname())'
Submit and check any of them:
sbatch hello_python.sh          # -> Submitted batch job 123456
cat hello-python-123456.out     # -> Hello from Python 3.12.0 on mbcpu-001
Swap the one-liner for python3 my_script.py (or Rscript my_script.R, julia my_script.jl) to run a real program the same way.
The next section covers asking for the right resources (Section 5.3); choosing the right queue comes after (Section 6.1).
5.3 Asking for resources
5.3.1 Cores, tasks, and the words Slurm uses
For most jobs you need two ideas:
- A task is one instance of your program. Most jobs are a single task.
- CPUs per task is how many cores that program can use (its threads).
#SBATCH --nodes=1                # keep a job on one node unless it's true MPI
#SBATCH --ntasks=1               # one program instance
#SBATCH --cpus-per-task=8 # that can use 8 cores- Single-threaded program?
--ntasks=1 --cpus-per-task=1. - Multithreaded (OpenMP; NumPy/SciPy linear algebra via multithreaded BLAS; Dask/xarray)?
--ntasks=1 --cpus-per-task=N, and setexport OMP_NUM_THREADS=$SLURM_CPUS_PER_TASK. - MPI across many nodes? Use
--nodesand--ntasks, and launch withsrun(Section 7.4).
Asking for 8 cores does not make a single-threaded program faster; it reserves 7 idle cores and makes you wait longer. Match the request to what your code can use.
5.3.2 Memory
Set memory explicitly, every time. Two ways:
#SBATCH --mem=32G              # total memory for the whole job (simplest)
# or
#SBATCH --mem-per-cpu=4G # memory per core (scales with --cpus-per-task)mb
If you omit --mem on the default partition, you get 10 GB per core, so --cpus-per-task=8 becomes an 80 GB request. That queues slower, and at high core counts the inflated request can hit your QOS CPU cap and be rejected at submit. Set your memory explicitly. (Full story in Section 5.2.)
For a first run, estimate a bit high so the job isn’t killed, then measure and right-size (below). A job that exceeds its memory request is killed by the out-of-memory (OOM) killer (Section 8.2), so memory is the one resource where running out is fatal rather than slow.
5.3.3 Time
#SBATCH --time=04:00:00 # HH:MM:SS (or D-HH:MM:SS, e.g. 2-00:00:00)Your job is killed the instant it hits this limit, so the request must exceed the real runtime; pad by roughly 25%. Don’t pad wildly, though: a shorter time limit means a lower QOS ceiling and better odds of backfilling into gaps, so it often starts sooner (Section 6.2).
--time
Partitions on MedicineBow don’t set a default wall time. Without --time, you inherit the partition maximum (7 days), which your QOS will likely reject (the normal QOS caps at 3 days). Always set --time yourself.
5.3.4 Over-asking slows you down
A bigger request is a rarer set of free resources to find:
- More cores / memory → fewer nodes can satisfy you → longer wait, and you’re charged for cores you didn’t use.
- More time → lower-priority QOS tier and fewer backfill opportunities → longer wait.
- A GPU you don’t use → you sit in the busy GPU queue for nothing (Section 6.2).
The fix is to right-size.
Twenty-six months of accounting data (~70 million jobs) show this, with a twist worth understanding:
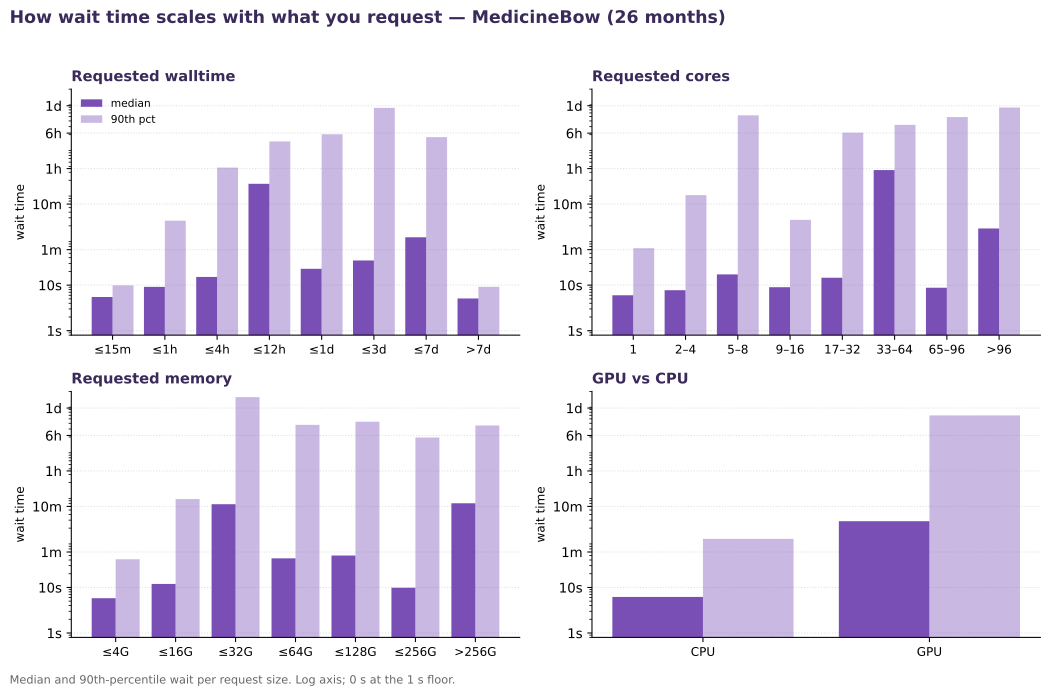
The median stays near a few seconds because the machine is dominated by tiny one-core jobs that always start fast. The lesson is in the 90th percentile — your unlucky wait: a job asking for many cores, lots of memory, or a long walltime can sit for hours where a small one waits seconds, and a GPU job waits far longer than a comparable CPU job (Section 6.2). Right-sizing doesn’t just save your allocation; it protects you from the long tail.
5.3.5 Measure, then right-size, with seff
After a job finishes, seff tells you what it actually used versus what you reserved:
seff 123456Job ID: 123456
State: COMPLETED
Cores: 8
CPU Efficiency: 24.13% of 04:16:00 core-walltime <- you used ~2 of 8 cores
Memory Utilized: 5.31 GB
Memory Efficiency: 16.59% of 32.00 GB <- 32G reserved, 5G usedRead that as: next time ask for ~2 cores and ~8 GB. Low CPU efficiency means you reserved cores your code can’t use; low memory efficiency means you can ask for far less and start sooner.
Check what you’re allowed to ask for with ARCC’s helper:
showuserlimitsNext: where to send the job — partitions and QOS, and their queue-time consequences (Section 6.1, Section 6.2).